Monday, November 19, 2012

Craft Fair Cometh

  Hey friiieennnnds, time for a little bit of shameless shelf promotion!!  I've got a booth at the local Capitol Hill Indoor Flea Market this Saturday, November 24th, from which to hawk my various wares!  I'm teaming up with my fabulous friend Vi, who makes adorable plushy penises which she fashions into ornaments and catnip toys!  They're charming and hilarious - nothing like watching your precious feline prince fellate a catnip cock to give you the giggles! 

Here, for your edification, is my fat pet Nigel with his newest chew-toy.


  Meanwhile, I'll have my schizoid collection of gaudy costume jewelry to tempt you with.  Featuring a fanciful array of shrinky-dink charms and the always-classy gold glitter tooth pendants, plus some super-exciting one-of-a-kind goodies, like itty-bitty wearable aquariums!  It's the perfect place to start your holiday shopping and deliver something unique and special!


Come visit me on Saturday!!

Saturday, November 3, 2012

MOAR HALLOWEEN!!!


  Halloween is seriously my fave holiday, I never want it to end.  In fact, I'm going to another costume party today, this time with my awesome family!  Also, why didn't I post this picture with my last post?!  It's awesome, if I do say so myself!

  You always get to do the best makeup on Halloween, and this year I made sure to get deep in that MUFE flash palette, since I paid for the damn thing, I might as well get the most out of it!

  My beautiful friend Britt let me beat her face for a 'harlequin clown' look, and I gotta say I'm pretty proud of how it turned out!  I have a lot of experience painting my own face, but I tend to get the shakey hand when trying to do anyone else's!


  The whole face is MUFE flash palette, set with all-important Swagger finishing powderAs I live and breathe! TELL ME that is not the cutest clown you have ever seen!


  Oh my gosh, how cute is this outfit, too??  Crinolines for life, babies!  I have a gigantic steamer trunk full of pantyhose and tutus, I LIVE for that shit!


Wednesday, October 31, 2012

Happy Halloween!

  Ahh yes, boys and ghouls, it's the most wonderful time of the year again!  I'm talking about Halloween...what did you think I meant?!  I can't get enough of kitschy decor, fake blood, and fun-sized candy bars!!
Such a shame I didn't get a proper shot of my lovely neck scar, which you can barely see here!
  OK first let me just talk about my costume makeup for just a second here.  I was really pleased with how this look turned out!  I wanted a green face without having to cover myself in greasy makeup, but I didn't want to end up with a bloodless zombie face, so powder was out!
  I have this epic palette of high-end grease paints from Make Up For Ever that I am absolutely obsessed with!  The green on my face is straight from the palette with no added tints.  The colors are rich and beautiful and I absolutely adore it, but caveat emptor: these paints are greasy as fuck.  Now, I'm an oily-faced lass to begin with, but these are pretty insanely slippery when you first put them on!  This means a few things, both good and bad.  Happily, this makes it insanely easy to apply and also to fix any mistakes once you've got it on your face.  Unfortunately, it also means you need to give it proper time to cook, girl.  Gotta let that shit just SIT THERE for a good hour before I feel confident.   
  Additionally, it pretty much requires a finishing powder, so you're stuck with a velvet finish whether you want it or not.  I use Swagger finishing powder, which I ALSO freaking love.  Now, I love MUFE, but their finishing powder is half the size and twice the price, and it is made of exactly the same thing!!  WHAT in the WHAT, girl!   Don't be dumb, comparison shop.  And support small business!  The whole Swagger line is handmade by the divine Blake Karamazov in San Francisco!  We will be revisiting her again soon, to be sure...
  The lips are Jamaica by Ka'Oir, which is pretty great, too.  It's pretty creamy, and suuuper pigmented, so you don't have to put a heaping ton on to turn normal-girl-colored lips green!  I'm not crazy about the way it smells, but it's a small quibble.  I mean, it's not like it stinks.  It's fairly long-lasting and comfortable to wear, so I would recommend it.  The brand has all the freaky colors you have been wanting but unable to find.
  The eyeliner is a cream liner by MUFE, which I used on my stitches as well.  This shit is the BOOOOOMB!!!  I will never use liquid liner again, I swear to you.  This stuff is the total opposite of the paint palette - it's super waxy and dries quickly!  It stays richly black and flexible all day, too - no crusty, flaky business.  PLUS it doesn't require a powder to stay in place. Hurrah! Well worth the price.  I love it so much I would marry it. 
  My skin has nothing but mineral powder and the soft, forgiving sheen of my webcam's meager flash.


Completing the look with a Bride of Frankenstein bouffant and some gangrenous sutures!


  Now I've been dying to try a little spooky dripping blood look on my nails, but red just wasn't gonna match my Frankenstein ensemble, so I went with neon orange and green spooky slime!  I love neons, but they are almost always a slightly translucent gel, which is not great for coverage over dark colors, and naturally I needed a black backdrop for my Nickelodeon-colored slime nails.  Solution?  Mix one drop of white polish to four or five drops of neon polish, and viola! You have opaque neons!  Sure, they end up being a slightly paler hue, but once you've got it on your hands, no one will be the wiser!


To paint the slime, I used a combination of a thin, stout nail brush, and a small dotting tool.  The dotting tool was great for applying even coverage and achieving the drips.  In fact, the dotting tool is the most useful for this look.  I highly recommend using something similar, but in a pinch, a nice toothpick or even a dry (and cleaned!) ball-point pen will do lovely!  Be sure to wipe the tip every couple of dots to keep your tool precise and your polish from getting gooey.

Pretty sure these pants are the backdrop to 50% of my photos...


Monday, October 1, 2012

Double Dots Day!

  Well, it's been a wacky couple of weeks since I last updated, and since I made sure to buy a round-trip ticket to Crazytown, I was happily able to come back!  I've since done quite a lot of "housekeeping" in my life, and now I think I'm ready to come back to getting my happy on about my nails.  And, and, aaaand!  I have some exciting new designs to share in the coming weeks, so stay tuned!  Not only that, but some hotly-anticipated mail will be arriving soon to my mailbox, and I'll finally have something other than manicures to share!!

  But enough chitty-chatty, let's get down to the business of polka-dots!  I adore polka-dotted nails, but I'm not keen on the stamper (I ordered some piece of shit version that doesn't work as well as my friend's "As Seen On TV" version - bah!) and dots are so hard to make with a brush!  Happily, whilst trolling Amazon I found a set of ball-point pens in various sizes, specifically for making dots and water marbling!  These little mofo's are a revelation, I tell you! 

  Let me warm you up by showing you how my stinky toes turned out!  I was attempting a comic-book gradient with a pepto-pink background (some new Revlon that I can't recall the name of) with white dots.  I used a few different sizes of the pointer tool to achieve a variety of sizes of dots - I tried to graduate the sizes to give the impression of a fade - to limited success, I think.  As always, the rest of my toenails get an abridged version of the design...they're just too small to give a shit about!

  Not quite finished with the comic-book theme, I decided to try out a little party-nail action on my fingers.  I used Sally Hansen's Smooth & Perfect in Dune as the base coat.  I have mentioned this color before, and I think I'm gaining more of an appreciation for it - it's nearly clear, and it works like a mineral powder - just makes my nails look like a more perfect version of their natural selves!  Also, it's not a pink-tinted sheer, which makes it unique!

 I've done a slightly-offset two-color diagonal grid pattern here.  The offsetting is what gives this look it's graphic, Lichtenstein-esque quality.


  Surprisingly, the higher contrast color combinations ended up looking a lot better - my favorite combo ended up being the orange/blue (left ring finger).  I had initially thought a more subtle blend would be the answer, but you can see on the yellow/green green/orange combination, that this was kind of a fail.  Perhaps a brighter background would have given the colors some pop, but you know how I feel about white nail polish....

Friday, September 14, 2012

50 Shades of Grey

  Let me start off by saying I hate myself for that title, but I just couldn't think of any other puns on the color grey.  So, I'm sorry, but the awful title stays, because it's too perfect for a post all about how much I loooooove grey nail polish!!
  I love it because it's perfectly neutral without being all gothy and black, and it just looks soooo classy!  Besides, mattes have been really in this season and grey is just so hot right now!  I also love grey as a base when doing really any fun nail designs, because I find that it's easier to use than white polish, both in terms of number of coats needed and quality of polish,* but it's almost just as bright, so you can make your detail colors really pop.  (*Seriously, can we talk about white nail polish for a second?  Like, why is it always, no matter how much you spend on it, the thickest, goopiest crap of all time?  I mean it - my Wet 'n' Wild is equal in quality to my OPI.  They're both fucking horrid.  Sometimes I think we were better off back in the WhiteOut-as-nail-polish days of yore.  And streaky.  Always streaky, so you need at least two coats to make it even.  But it's so thick that it's way heavy at even just two coats, which makes it start chipping the moment it dries?  Ugh. Ugh. Ughhh.  Anyway...)


  Now that I've finished talking about how much I hate white nail polish, (not the way it looks! I love that part!) here's a look with white nail polish!  Super simple white half-moons.  I love a good monochromatic manicure, too, so bonus!  The white is OPI, the grey is Revlon Top Speed in Hazy.  Love this shade, it's one of my favorites.  White half-moons are typically done on nude nails, like a reverse French, but I love using a surprising shade for the main color.  It's playful while remaining totally chic.  Perfect.


  My current nail obsession is ombre glitter.  It's incredibly easy to do right and make it look like a pro job!  You want to use a glitter with a clear polish base - the great thing about clear bases is that any brush strokes and roughness is magically erased with a top coat - not so with colored gel bases.  And you are going to need a top-coat to gloss over the mountain of glitter if you try this look.

Sigh, stupid camera.  Top photo has most accurate color.
  It's a simple process: I did my longest layer first, letting the brush drip heavy at the base of my nail, and taper off to nothing by the time I got to the tip, actually stopping the brushstroke before I reached the end of my nail.  After that base layer dried, I just dabbed with my brush, concentrating at the base, and using the brush to really push the glitter into the places that I wanted it.  It's easy to play around with the glitter to get it looking just how you want it.  Finish with a nice, thick top coat.  Looks awesome starting from the tip, too.

  This is the same grey as above, only looking totes diff!  Awesome!  The glitter is Sephora by OPI in Spark-tacular!  (God, these names....)  But really, this is an awesome polish, and I love it so much I just might marry it.  The photos barely do it justice, but I tried, which is why you get to behold it in blurry realism and also with wrinkle-and-blemish heightening flash!  How lucky for you!

  Now, I really thought I had more lovely grey manicures to share today.  I guess this is not much at all like 50 Shades of Grey, except that trying to photograph that grey was torture.  (Ba-dum tsschhh!  I'll be here all week...)

Sunday, August 26, 2012

Matte Magenta Moons

  All the nail blogs say the easy way to do a moon manicure is to mask off the moon area with one of those round-sticker-binder-ring-protector-thingies to make the moon shape.  They're easy to find anywhere, and they're not so sticky they'll peel up your base coat, which I suppose makes them fairly ideal.  I've always been a bit skeptical about it - are the circles the right size?  Will they stick well enough to prevent leakage?

  So I decided to find out.    

  I thought the overall effect was...okay.  I'm not thrilled, and I think I could do a nicer job by hand after three glasses of wine, even.  Hey, sometimes I get better at this shit when I'm drinking!

  Anyhoo, there was minor seeping, especially at the corners!  In fact, the binder rings are rather thick for a sticker, and they kept trying to pop off the edges of my nails!  I have very curved nails, so if you have a flatter nail plane you may have more luck.  This was a total pain-in-the-ass for me.

  To conclude this experiment, but not this post, I would say that I prefer not to use a masking method for the moon manicure, or at least not with binder rings.  However!  This method is useful if you want a 'moon' that is a lighter or sheerer shade that won't work as a top layer.  For this mani I used Sally Hansen Smooth Perfect in Dune as the moon color, which is a lovely sheer nude that would never show up over anything!  The top is Revlon Plum Seduction, which is a really lovely magenta.

 Finally, I decided this would be a good look to try with the new matte top coat I just got!  Inspired by a shiny-black on matte-black french manicure I saw, I have been dying to play with matte colors!  It's about time a matte top-coat was made readily available!  I've always hated how the oh-so-necessary protective top-coat always ruined the finish of a matte polish.  BUT NO MORE!  Behold!  The matte-ness!

Regular polish on top; with matte top coat on bottom.
 Yeahhh!  I think it turned out puh-retty sweet!  It's a bit less drastic a difference due to my camera's overactive flash, but I think it's a pretty good representation of what we're working with, here.  I paid like, ten bucks for this matte top coat, goddamnit, so it better work!
  Oh yeah,  it's Sephora by OPI brand, if you are interested.  It was the only one I could just walk to a store and buy, because no drugstores seem to have caught on yet, but I work a block away from Sephora.  (Danger ranger!)

  You can really see on the thumb in the bottom image, how the light diffuses much more softly on the matte finish.
  The only downside to the matte is that it tends to highlight any imperfections in your base.  I felt like uneven spots or brush streaks were more apparent after I applied the matte, so that's something to think about if you're gonna try it!  Nonetheless, I'm excited to try some new looks with this stuff!  One day I'll make the black-on-black look as good as the pros...my attempts so far have been too embarrassing to share - I'm sure you understand.

Tuesday, August 7, 2012

So, THIS happened...


 Hello, boys and girls, and welcome to a rousing adventure in WTF-land!

 So, I keep my vast collection of nail polish in a plastic bin with a lid that barely stays on anymore.  It's about as deep as it is wide (approx 1.5 feet square), so when you have as many nail colors as I do, you have to dump out the whole stupid bin every time you want a color that isn't on the uppermost layer.  One day, I'll buy myself one of those classy-as-fuck clear acrylic racks that salons use to display their laquers.   I'll mount it on my goddamn living room wall, and forever after enjoy manicure convenience.  Until then, though, I have this shitty bin. 

 Now, despite how much pressure the bottom layer is surely always under, I've never had any issues.  I mean, shit, any polish you buy is like 50% super thick glass bottle!  Those things are indestructible!!

Right?

....

......

Ahem.  So, with this line of thinking, you can imagine my surprise when I dumped out the box and found this.


Shit, and it's an OPI color, too!  I usually only get those as gifts, since I don't like spending more than six dollars on a bottle of polish.  RIP Yes I Can-Can, you were a great color.  Now I need a new sexy dark red, STAT!

Friday, August 3, 2012

70's Beach House Manicure

  "I'm gonna call this manicure House of Sand and Fog, cuz it's beachy as fuck!"


 I am RRREEEAALLLYY excited about this manicure!  A fabulous geometric look starring my favorite color palette, and featuring my debut use of skinny nail tape!

 This lovely harlequin pattern was lifted right from Chalkboard Nails, and all I did was flip it 'round and change up the colors a bit.

  I'm really into this muted, faded-70s-basement palette.  I just cannot get enough peach!  Colors used here are my beloved Savina White Lavender as the base color, accented with Sally Hansen's Commander in Chic (slate brown), and First Kiss (that's the light coral).  And, of course, lovely Revlon in Jaded, and Minted, (both of which I am LOVINGGGG!) as well as Make Mine Mango (dark coral.)  Jaded is that oh-so-totally-not-Jade-colored chartreuse, and it is pretty much the shit.  Almost neon without going whole hog, but still totally jarring and flashy.  I needed one color to take my palette out of the safety zone!  I think having one clashing color can really make the whole palette pop a bit more.  Nothing worse than a mani design that ends up being a washout!


  You can see the chartreuse at work here, totally punching up that minty green and playing off the blue tones, and brightening that darker coral, too.

  I'm really into this design and this color palette, and I'm gonna have to just come out and say it - I think this one my be my favorite.  Maybe my favorite ever.  Basically I love this mani so much I want to marry it.  MAYBE I WILL!

Wednesday, July 18, 2012

Aztec Manicure

  Finalmente! Más uñas pintadas!

  Ok, we're excited to be back after so much blog silence.  Now, I was calling this my tribal manicure, but in an effort to be less casually racist*, I am changing its name to Aztec manicure because I think it looks a lot like traditional Aztec textiles in color and pattern.  I was inspired by a Southwestern look done by the inimitable Pierre, I just decided to top him and do a whole damn manicure in this style.
  I'm really pleased with how these turned out!


 In case you are wondering, yes, this did take me for-fucking-ever.  I spread this one out over three days, doing three or four nails per day.  Each session was probably a couple hours long.  So we're gonna clock this mani in at 6 hours of work.  (Wow!  Writing that out makes it sound infinitely more insane!)

  If you look closely, you can tell that each nail has a base color, which shows up in most (if not all) of the stripes.  In retrospect, I think I would not start with a base color, because in the event that you don't want that color in every stripe, you end up doing a lot of unnecessary layering, which we all know leads to manicure doom.  Less is more.
  

Yowza! What a fucking mess!
  You might also notice how messy these nails are around the edges...allow me to explain. 

  I find that doing decorative manicures by hand can get pretty messy, especially when you want a nice, clean edge that's flush with the edge of your nail.  No gaps, please!  Sometimes if I know I'm going to get really messy, like with a moon manicure, I will use scotch tape to mask off the "danger zone" of my nail.  Otherwise I just go ahead and paint it right off the nail and onto the skin, like I'm sure everyone does.  My difference is that I don't go back and clean up with a cotton swab and some remover - what a stupid fucking waste of time that is!  Whenever I make the mistake to do this, I end up scrubbing off part of my design!


  Pro-tip of the day is this: Do your manicure at the end of your day.  Let it dry, sleep in it, and your morning shower will soften all those excess bits of polish on your hand and slough them right off without nary a scratch or stain! I took these photos as soon as I finished, in order to get the best preserved shot of the design as I could and well, I paid for it in cleanliness.


*I highly recommend following this link if you have the time to read an approx. two-page paper.  It explains things a lot more eloquently than I dare attempt to summarize.


Friday, July 6, 2012

THIS IS AMERICA!!

We take dress-up themes very seriously.
  If you know me at all, you know I have precious little civic pride, but that isn't going to stop me from enjoying a thematic dress-up opportunity or the chance to paint my nails the appropriate holiday theme!  Hence, AMERICA! The Manicure was born.  I really wanted to paint a few little flags, unfortunately the US flag looks like about a hundred other flags in the world (have you seen Liberia's flag?  Seriously it looks exactly like what I'd paint a "simplified" US flag as) and I really didn't want to have some Texas-ass-lookin' flag, either, so I had to get crafty.
  I recently ordered some nail striping tape as part of an Amazon nail-accoutrements binge.  They came as a set of ten colors for only a couple bucks, but the tape is so so thin (only about 1/10 cm) that it's really kind of hard to work with.  I found that it was better to firmly adhere the tape to my nails before trimming the edges to length.
  I generally prefer to use the tape just as masking, because tape on nails never really stays put, no matter how many layers of top-coat you apply.  But I had to make an exception because I just didn't want to get into the nightmare of masking off all the stripes of the flag.  So, there's a bit of both going on here, though the flags were made much easier with the help of super-skinny white tape!


  As per usual, not a great picture but you get the idea.  It's always an epic battle to balance sharpness with accurate color on my stupid little digital camera, but I do try.  This red is a newsie from Revlon (my love!) called Fearless, it's a totally gorge slightly orangey-red, and it's just perfect.  It's almost a poppy red, great for the summer.  I currently have it on my toes and it's giving me another reason to just stare at my feet when I walk!

Monday, July 2, 2012

Deep Thoughts

Ever notice how in any public restroom, people act like EVERYTHING is dirty?  Everything except the toilet paper that's been sitting in the stall near the toilet all day, that is...

Tuesday, June 26, 2012

Double Nail Extravaganza!

  Oh my god!  My nail is finally healed and I've been varnishing with a vengeance, I tell you!  Remember back here when I hurt my stupid thumb?  Well I swear this nail has been growing extra-fast to cover the exposed under-thumb territory.  Anyhoo, aside from a little bit of weird, sad discoloration, it's back in business!

  Let's kick off today's double header with the mutha'fuckin NEON YELLOW manicure that I went on a drugstore odyssey in order to achieve.  Would you believe I went to three stores before I found the damn stuff?  And naturally I went for the one everyone had mentioned on teh blogz, which was, sadly, Neon Melon  by Sinful Colors, which sucks.  It's awful, streaky, gloppy stuff, and I left it on my hands for barely half a day.  The next day I went to Sally's Beauty Supply like a good girl and bought some China Glaze Celtic Sun which, true to form, goes on fabulously - smooth thin layers, just the way I like 'em.   This level of opacity took three coats.

Just ignore my janky thumb on the right, there.  It's just the aftermath of the thumb-trauma - don't judge me.

  Ahh, and viola!  What light from yonder fingertip breaks?  It is the east, and Neon Yellow is the sun.  Call me a trend whore all you want, but god damnit, I love me some neon yellow right now!  It just looks so good!  And in a June marked by grey skies and wet shoes, it's really cheering me up.

  I can't resist getting all artsy on my nails, so these lovelies are accented with a couple of blues - an unremarkable medium-blue I bought from Urban Outfitters that barely deserves a mention, and Revlon Royal, which is a glorious and delightful polish.  I also used another unimpressive UO polish, a grey that's a nice color, but a real shit polish, if you ask me.  I covered it with Sally Hansen Gem Crush in Glitz Gal, which I will talk more about in a minute.  I even added a few blue heart-shaped gems, which, while a little blurry in the photos, actually turned out pretty cute and far less tacky than my maiden voyage into nail gems.


That slight touch of rainbow!  Ah!  It's beautiful!!
  Now, I find that neons don't tend to last very long before they start to show signs of the various tiny traumas of my day, and get all opaque and cracked.  So once the neon went the way of the buffalo, I decided to run with that grey glitter on grey nails that I'd done on just a few accents above, and do something kinda classy for a change. 


  Oh my god, I have to say, this Sally Hansen Gem Crush line of glitter topcoats is fucking awesome.  I'm totally back into glitter, especially if it's a nice dense glitter with varying sizes.  It's got to have varying sizes of glitter in there, and lots of it.  The grey is awesome because it has just a touch of iridescence, which is a nice subtle color effect on the muted-for-glitter-nails grey.   Doesn't this manicure just look so effing glamorous!?  I spent the whole week just admiring my nails everywhere I went!

Friday, June 22, 2012

50/50 Nails

  Wow, slacking this week, huh?  How about another quickie about nails?  We love those.

Photographed on an LP with a picture of a leather jacket, not actual leather.  Weird!

  I love to do a little half 'n' half mani when I can't decide between two colors.  I decided to go vertical since to me horizontal halfsies looks like a french mani that didn't know when to quit.  For this I used Revlon "Jaded," which I absolutely looove!  It's a super smooth opaque that's not too streaky.  I usually need three coats, two if I'm being heavy-handed.  It's just a really great pastel and I fucking love it.  Honestly I just love all my Revlon polishes.  For a drug-store find, they are really great, and they last a while, too.  The purple is some ridiculous stuff called Island Girl, which I  naturally bought in Maui.  It's called "Waikiki Dream" in case you ever find it.  I bought this on a day-drunk afternoon, so I don't remember how much it cost, but it was cheap.  Finally, a black stripe to divide the sides!  This added a little depth to the look, and covered up my sloppy seams.  Bonus!

Here's a way clearer picture with less accurate colors.  The pale green just gets so blanched by my camera's flash!

Monday, June 18, 2012

[Self-Promotional Blog Post Title Goes Here]

Oh look, here's me on It's My Darlin' from last winter!  I just remembered this on the bus this morning, so I thought I'd do a little personal pimping and share it here. 

It's a serious winter outfit, replete with wool coat and wide-brimmed hat, but the pièce de résistance is obviously that insane quilted polyester skirt I'm wearing.  I made it in high school out of a positively glorious queen-sized '70s quilt I found at a thrift store near my folks' place.  Honestly, I have about a yard and a half of this quilt left-over, which is currently adorning my ugliest armchair.  I swear every time I look at it I regret having unceremoniously chopped it to bits to make a few insane looking skirts.  But at least it got me some props, some eight years on, right?

Cribbed my glamor shot from It's My Darlin'.  Credit is due, natch.

Thursday, June 14, 2012

Pebbles Flintstone Manicure

  It's been a slow week here in Blogland, and especially in Manicuria.  I can get a bit careless with my nails, since I am often working with my hands and using my nails as tools.  Just two weeks ago I was doing god-knows-what and clumsily brought my hand down with a mighty force on my coffee table.  Seriously I don't know why or even how exactly I did it - maybe my depth perception is off? - but I did, I smashed the hell out of that table with my thumbnail.  Unfortunately there was a casualty, as a long, deep shard of nail ripped off, bled a whole bunch, and then made a blood blister under the nail.  It hurt like a bitch.

  I didn't want to paint while I monitored the nail and prayed to the nail gods that the dang thing wouldn't fall all the way off.  Happily it doesn't seem like it's going to jump ship, so I went ahead and gave 'em a few coats and even glued some gems on there.  I just picked up my first nail gems, which I don't usually like because shit sticking off my nails bothers me a lot and I tend to just pick it off.  Besides, it makes your manicure more fragile and that is just not good for doing stuff with your hands.  There'll be more on that later, meanwhile I'm busy trying to figure out how to make nail rhinestones look like something other than super cheap n' tacky. 

 To tide you over, here's a little favorite I've been sitting on for a while.  For some reason I only have a right hand shot of these, and it seems I took it after a few days' wear, but oh well, you still get the idea.

Triangles. For. Days.
  I'm calling this my Pebbles Manicure because it just reminds me so much of the youngest Flintstone.  The base color is my beloved favorite, Savina "White Lavander," with some boring old Revlon black for the details.  I am definitely in a triangles phase right now, it's all I wanna paint.  Trying a few different styles here, and I'm feeling quite fond of the vertical zig-zag action on the pointer nail.  An idea to try for a full set, I think!  I'd say this look counts as party nails, too.

Friday, June 8, 2012

Yellow Triangle Moons: Variations on a Theme

  Despite every fiber of my being resisting, I'm going to blog in the name of consistency.  It's been a rough week.

  Anyway, when I'm feeling like an easy manicure, I usually do a simple duo-tone look.  I love, love, loooove half-moon manicures, so I've been having fun with variations of the moon manicure!  One of the easiest and most obvious variations is, of course, triangles!  (They're so hot right now!)


Neon Yellow Triangle "Moons"

More accurate representation of the colors.
  This particular color combo, StripeRite neon yellow over Revlon matte grey (I'm gonna have to check up on that one later, I cannot remember.  I think it was called "Cloud" or some such nonsense...)  This looks so, so much better in photos than in real life.  The yellow just doesn't pop from the grey unless it's got a direct light source.  SO, things to know if you want to try this color combo.  I'd recommend outlining the triangles in black, or doing a base coat of white before you apply the yellow.

You can see in the second photo how much the yellow sort of blends into the grey, and you completely lose the tips!  They just look like regular half-moons! They're just too close in hue, which I found surprising.  Ah, adventures in color theory!

Tuesday, June 5, 2012

Springtime Toes!

 
  Now I don't usually spend this much time on my toes, (it's just such an awkward position, ugh) but I was in a mood so I did my nails and my toes.  I just had too many ideas, and didn't have room in the nail theme for this '90s abstract-floral thing I wanted to try.  And since it's still technically Springtime and the weather is rainy as shit in Seattle, here's a lovely springtime toe jam!  I decided to do all the rest of the toes in different combos of the floral palette, since my toenails are so tiny that there's not much to paint and i had to keep it simple.


  The floral was really simple, I just did layers and layers of big irregular blobs and vague flower-shapes, and a few streaks of green.  Then I added a few yellow dots in the centers of the blobs, and viola!  Looks like flowers.  This is a good look to try for some party nails, since you probably don't want to attempt full floral on the first try, and you can use the other nails to practice your polka dots and stripes!

Wednesday, May 30, 2012

Deep Thoughts

An elephant never forgets.  Smoking marijuana has been shown to negatively impact short-term memory.  So what about stoner elephants?

Tuesday, May 29, 2012

Neon Orange Triangle Tips

  If it wasn't already apparent, I am obsessed with neon orange nail polish right now.  It's just so...so...  I don't know, juicy?  I love it.  It's like red's sassy cousin who likes to party.  It's also got huge hipster-ugly potential, which I love.  There's just something about an especially jarring color combo.  When colors fight each other, I feel it almost gives them an enhanced richness.  Like when you see something you've never noticed before but you're sure it's always been there.  "How did I not notice that about neon orange before?"

 Today's is a nice simple manicure, a bit of a punk-rock take on the classy French tips.  The colors are the Sally's Beauty StripeRite in neon orange (the only StripeRite I will ever truly love.  It has the perfect consistency.  As I said previously, the others leave a lot to be desired.)  The base is maybe my favorite polish of all time.  The brand is Savina, which is always, always available at Nordstrom Rack for a mere four-ish dollars.  This particular color is "White Lavender," which is neither white nor lavender, but the perfect opaque peachy-pink-nude.  I really love it as a neutral base, or for a more mod-looking French.  The peach also makes a really nice base for any design just by virtue of it's opacity and color - it doesn't show through, and while it's not as brightening as white, it won't darken your top color (which I HATE!!!)

  The neon orange against the softy-lingerie peach looks so wrong it's right.  It's got that awkward '70s color vibe that I just love!! (One day I'll show you a picture of my living room decor.  I think will explain everything!)


  If you don't have nail art brushes or a steady hand, you can totally tape off this manicure and do it that way - usually I see it done where the tip color is done first, then masked off with a corner of scotch tape, over which the main color is applied.  I do the base coat first and free-hand the triangles on top, so they're not quite uniform as you can see, but it's not hard to get these looking right free-hand.

Monday, May 28, 2012

Swimmingly Cute New Looks for the Modern Mermaid

  We hosted an epic house party for my dear Friend of the Animal's birthday this past March, where some local talent played the house down, and when the cops showed up, they said "party on."  A night of epic proportions, as well as epic costumes.

  We like any excuse to wear a costume, and birthdays are by and large one of the best occasions - especially when you get to choose the theme.  Tonight's theme?  Under the Sea.  The birthday girl had a dream... a dream of being a mermaid.  Could I, armed with a serger and three yards of pink satin spandex, rise to the challenge?

  Oh it took trails, it took tears.  I realized late in the game that you can't beat the serger, so you may as well join it.  You want the machines on your side.  Anyway, I'm still learning the ins and outs of my new overlock machine, so what better way to practice than sewing slippery spandex to thick ruched lace?  Excellent idea.

  The pattern for these skirts was so simple - I just used my favorite American Apparel high-waisted pencil skirt as a pattern!  AA garments are SO easy to reconstruct, never buy something in two colors when you can just get one and then make as many as you want! Seriously, this skirt is made up of a mere three separate panels. My only alteration was to lengthen it slightly. The 'fins' are made from two layers of lace cut into a right-angled triangle and gathered along the hypotenuse (hey, algebra, never thought I'd meet you here in costume-making 101) which was stitched to the hem of the skirt.  The gathering rounded off the edges of the fins nicely, giving them the oh-so-Ariel shape that I wanted. 

Me and the Birthday Girl pose for a photo
In lieu of a clam-shell bra, I made us each a cute little pair of sequined Starfish pasties.  (The dancing eventually compromised the integrity of my pastie glue. I recommend packing a bikini top whenever you wear pasties, just in caseties.) The look is topped off with some seahorse necklaces and mermaid crowns.  Birthday girl bought a packet of plastic sea creatures at the dollar store, which we spray-painted gold and and pink to match!

  I'm also wearing the perfect mermaid lippy from Swagger Cosmetics by the incomparable Blake Karamazov.  Scope it out at http://swaggerco.bigcartel.com/ !
Starfish pasties!

   Here's a front-n-back view of the pasties where you can see how they're made - vinyl backing cut and shaped into a little cone, and decorated with chained sequins (way easier to use than applying single sequins one-by-one.  That would be maddening.)
Not the best photos, but you get the idea.

  And of course, no look is complete without a coordinating manicure.  Here's a pretty simple half-moon with a shimmery teal over hot pink, with a few selective touches of glitter - just a couple of the moons and tips have a glittery topcoat.

  **Bonus!  The mermaid skirt doubles as a sexy nightclub dress!  I'm all about turning a long skirt I love into a strapless dress - just throw a belt on if it's a loose skirt and viola!  New dress.

Thursday, May 24, 2012

Sick Day DIY! Leather Braid Accessories

  So, I'm home sick from work today, generally just wallowing in my own snotty misery, and occasionally arguing with my cat over what time is dinner time.  My mom always said I was a "bad at being sick," also known as "world's worst patient."  It's just better for everyone that I stay inside.

  Luckily for me, the Lovely Les came by with a special pho delivery, and I could not be more ecstatic or grateful!  I will live to blog another day. 

  AAAAANYWAY, let's get down to crafting.

  I had to crack open my beading box to fix an old necklace, and much like Pandora's, shit just keeps coming out of this box, begging me to do something with it already!

  I decided to make a copy of this awesome brown leather braided wrap bracelet that my Dear Roommate owns.  She wears it all the time and I've secretly been plotting how to make my own.  Happily for us all, it's super, super simple!  In fact, my source for leather was a package of rawhide shoelaces that I bought at the drug store for about five dollars! (I used Kiwi brand, but I'm certain any old rawhide shoelace would do.  The Kiwi ones are nice and long - I made my bracelet AND ring out of just one!  I have a whole 'nother shoelace's worth of crafting ahead of me!!

The finished products!

  Pretty simple start up, I measured and cut my leather strip into three equal lengths, and glued the three ends together, side to side, and about 1cm down the length of the strip.  (I love Beadalon brand "Bead Fix," which you can almost always find at a craft or bead store.  Unlike most super glues, this one dries completely clear, making it a god among super glues.)
  Next I used some flexible gold jewelry wire to reinforce the glued-together end and attach a lobster clasp.  Then you simply braid the leather until it's at desired length.  I braided long enough for a double-wrap bracelet, with enough leather left over (from just one shoelace, mind!) to make a ring, too!  In fact, the wrap-bracelet is long enough to double as a leather choker!  Bonus!! I did the same gluing and wrapping on the terminal end of the bracelet, to attach a clasp hoop.  I used needle-nose pliers to make sure the wire wrapping was good 'n tight, as well as the end secured so it doesn't get pokey.

Topside, and backside with lobster clasp.  Wondering if perhaps a closure like the ring would be better?


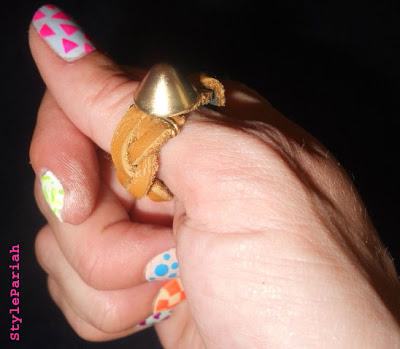
The ring got a little more complicated, as I wanted a complete band of leather without any gaps for a clasp.  In this case, instead of gluing the three ends together, I pierced each one width-wise approximately 1/3 cm from the edge of the strip, and ran a head pin all the way through each strand, which I then wrapped around the leather ends until there was no pin left, effectively creating a double-strand of wire on the topside of each end of the ring, which I attached using one of the fab gold studs I just got in the mail!  This one was a really last minute improvisation, but the two-pronged cone was the perfect size and shape to connect the sides of this ring!  It's a bit chunky, probably relegated to a thumb ring for the time being, but I'm thinking with some wear, this will flatten out into a nice, soft, any-finger ring!

Top and underside of the braided leather ring, which features a brass cone stud from my recent haul!
A more flattering view, of the ring on an actual finger!

Wednesday, May 23, 2012

ManiCure: Neon Checkers

OMG!  I'm surprised by how cool my nails are!
Party Nails, Party Nails, PARTY NAILSSSS!!!

I love doing outrageous nails.  I saw a checked swimsuit with a neon color scheme, and I knew it was meant for my nails.  (Once again using the webcam to combat my camera's phobia of neon orange.)

Here's a small close-up.  I did a 4x4 grid on each nail except a few, where I did a "zoomed in" look (like the pinkie and pointer on my left hand, which as we all know is way more difficult for me to paint.  So I cheated a little bit by simplifying my pattern.)

For these I used a white base (plain ol' OPI white) and some skinny-brush-having paints for the details, StripeRite from Sally Beauty Supply.  When I started getting into the minutiae of nail designs, I bought a whole bunch of these because they have teeny tiny brushes, and Sally's is like, a block from my work.  So, perfect.

...Except not.  These nail polishes are crap, yo.  The only ones that seem to work are the neons, since they seem to stay in liquid form and are very smooth, if a bit more viscous than I'm used to.  No amount of nail polish fixer can fix these, either, if that's what you're thinking.  I really recommend getting some nail art brushes - I bought a 15-pack on Amazon for like, three bucks, but a single brush at Sally's is nearer to fifteen bucks.

Next time, maybe a post that isn't about nail polish...

Tuesday, May 22, 2012

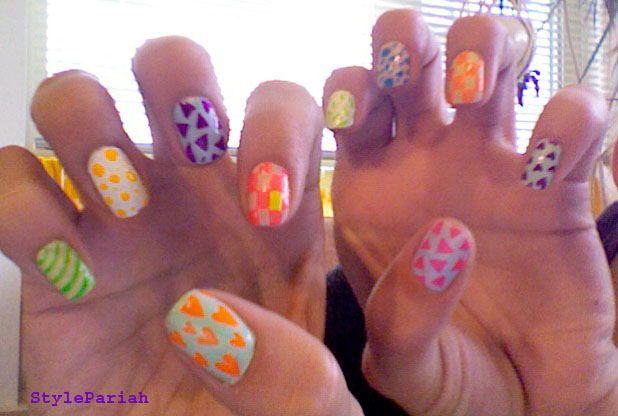
Party Nails: Clarissa Explains it All...

  Usually I have a basic idea, or at least a color scheme, when I set out to paint a new manicure.  Other times, I have so many ideas floating around that I can't pick favorites, so I'll do what I call Party Nails!  They are great for experimenting with color combinations, designs, or techniques (or a mix of all three!) 

For this look, I decided to pit pastels against neons, and combine my two favorite awkward color trends of the season!  (Seriously, why are both so wrong and yet....feel so right?)  I also wanted to try a funky '80s triangle pattern, but wasn't sure I'd be able to execute it properly on all fingers, so I went with a multitude of patterns!  Once finished, I realized I'd totally been channeling Clarissa Darling!  I'd like to pop my ladder up to her window so I could see what she thought...

Clarissa Manicures It All


And here are the results!  I have a lot of great ideas kicking around in my head after doing this manicure!

Despite doing a pretty good job (if I do say so myself) on the left hand (leftie pride - holla at me!), I still don't know if I'm ready for full triangles.  I use nail art brushes (super cheap on Amazon) to hand-paint all my designs, and precision definitely requires practice.

Anyway, I'm totally obsessed with both the triangles and the little hearts, especially the neon orange on mint green!  The colors are fairly true to life here, but the orange is so much more neon than these photos would have you believe.  For some reason, my little digital camera just doesn't want to pick up that orange!

I also took a long time debating between white and lavender as the final base color.  I ended up going with white, but in retrospect I really wish I'd gone with the lavender.  I think it would have jibed with the other colors better.  Oh well, something to think about for next time!


(Yes, that is a little pill-o-the-week case in the background left on the bottom photo.  I got this cute flower-patterned one at Daiso Japan, and I use it to organize my fake eyelashes! It's just the thing!) 

I am obsessed with the thumbs of this manicure!!


Monday, May 21, 2012

Mail Time!


Lookee here what came for me in the mail today!  A big bunch of gold studs from StudsAndSpikes.com!  They came super quick!  I'd recommend them for all your bedazzling needs!

ManiCures for the Common Nail: Benetton Manicure

  When I was in middle school, I had an extensive nail polish collection.  I would paint my nails a different color each week, and so dedicated was I that eventually my nails turned a sad yellow, and I gave them an approximately four-year break.  But I'm back to my early love of nail painting, and with more gusto than ever!  Armed with the superhero of long, strong fingernails, Prenatal Vitamins, I am once again ready to present ManiCures for the Common Nail.

  Today's look is something I call the Benneton Manicure.  I had wanted to just paint Jamaican flags, but as I am white and have no connection to Jamaica whatsoever, I figured this would be slightly inappropriate.  Not to mention the potential for exposing my dearth of Jamaica knowledge.  SO I went ahead and did a combo of flags, drawing from my cousin's Flags Of The World flashcards! I tried to keep in the Benneton theme and represent all the continents, at the very least.  Some of the sexier countries to had some of the more difficult flags, and some of the sexier flags belonged to the least sexy countries.  So, choosing who would make it to Nailsville was surprisingly intellectually involved.

  I am really happy with  how these turned out!  I'm especially happy with how nicely the Brazil flag turned out!  I'm left-handed, so results of painting with my right hand have been mixed, but practice has improved my control considerably!  I remember when I could barely paint a solid color without having a massive right-hand earthquake!

Can you guess them all?