Showing posts with label Neon. Show all posts

Wednesday, October 31, 2012

Happy Halloween!

  Ahh yes, boys and ghouls, it's the most wonderful time of the year again!  I'm talking about Halloween...what did you think I meant?!  I can't get enough of kitschy decor, fake blood, and fun-sized candy bars!!
Such a shame I didn't get a proper shot of my lovely neck scar, which you can barely see here!
  OK first let me just talk about my costume makeup for just a second here.  I was really pleased with how this look turned out!  I wanted a green face without having to cover myself in greasy makeup, but I didn't want to end up with a bloodless zombie face, so powder was out!
  I have this epic palette of high-end grease paints from Make Up For Ever that I am absolutely obsessed with!  The green on my face is straight from the palette with no added tints.  The colors are rich and beautiful and I absolutely adore it, but caveat emptor: these paints are greasy as fuck.  Now, I'm an oily-faced lass to begin with, but these are pretty insanely slippery when you first put them on!  This means a few things, both good and bad.  Happily, this makes it insanely easy to apply and also to fix any mistakes once you've got it on your face.  Unfortunately, it also means you need to give it proper time to cook, girl.  Gotta let that shit just SIT THERE for a good hour before I feel confident.   
  Additionally, it pretty much requires a finishing powder, so you're stuck with a velvet finish whether you want it or not.  I use Swagger finishing powder, which I ALSO freaking love.  Now, I love MUFE, but their finishing powder is half the size and twice the price, and it is made of exactly the same thing!!  WHAT in the WHAT, girl!   Don't be dumb, comparison shop.  And support small business!  The whole Swagger line is handmade by the divine Blake Karamazov in San Francisco!  We will be revisiting her again soon, to be sure...
  The lips are Jamaica by Ka'Oir, which is pretty great, too.  It's pretty creamy, and suuuper pigmented, so you don't have to put a heaping ton on to turn normal-girl-colored lips green!  I'm not crazy about the way it smells, but it's a small quibble.  I mean, it's not like it stinks.  It's fairly long-lasting and comfortable to wear, so I would recommend it.  The brand has all the freaky colors you have been wanting but unable to find.
  The eyeliner is a cream liner by MUFE, which I used on my stitches as well.  This shit is the BOOOOOMB!!!  I will never use liquid liner again, I swear to you.  This stuff is the total opposite of the paint palette - it's super waxy and dries quickly!  It stays richly black and flexible all day, too - no crusty, flaky business.  PLUS it doesn't require a powder to stay in place. Hurrah! Well worth the price.  I love it so much I would marry it. 
  My skin has nothing but mineral powder and the soft, forgiving sheen of my webcam's meager flash.


Completing the look with a Bride of Frankenstein bouffant and some gangrenous sutures!


  Now I've been dying to try a little spooky dripping blood look on my nails, but red just wasn't gonna match my Frankenstein ensemble, so I went with neon orange and green spooky slime!  I love neons, but they are almost always a slightly translucent gel, which is not great for coverage over dark colors, and naturally I needed a black backdrop for my Nickelodeon-colored slime nails.  Solution?  Mix one drop of white polish to four or five drops of neon polish, and viola! You have opaque neons!  Sure, they end up being a slightly paler hue, but once you've got it on your hands, no one will be the wiser!


To paint the slime, I used a combination of a thin, stout nail brush, and a small dotting tool.  The dotting tool was great for applying even coverage and achieving the drips.  In fact, the dotting tool is the most useful for this look.  I highly recommend using something similar, but in a pinch, a nice toothpick or even a dry (and cleaned!) ball-point pen will do lovely!  Be sure to wipe the tip every couple of dots to keep your tool precise and your polish from getting gooey.

Pretty sure these pants are the backdrop to 50% of my photos...


Monday, October 1, 2012

Double Dots Day!

  Well, it's been a wacky couple of weeks since I last updated, and since I made sure to buy a round-trip ticket to Crazytown, I was happily able to come back!  I've since done quite a lot of "housekeeping" in my life, and now I think I'm ready to come back to getting my happy on about my nails.  And, and, aaaand!  I have some exciting new designs to share in the coming weeks, so stay tuned!  Not only that, but some hotly-anticipated mail will be arriving soon to my mailbox, and I'll finally have something other than manicures to share!!

  But enough chitty-chatty, let's get down to the business of polka-dots!  I adore polka-dotted nails, but I'm not keen on the stamper (I ordered some piece of shit version that doesn't work as well as my friend's "As Seen On TV" version - bah!) and dots are so hard to make with a brush!  Happily, whilst trolling Amazon I found a set of ball-point pens in various sizes, specifically for making dots and water marbling!  These little mofo's are a revelation, I tell you! 

  Let me warm you up by showing you how my stinky toes turned out!  I was attempting a comic-book gradient with a pepto-pink background (some new Revlon that I can't recall the name of) with white dots.  I used a few different sizes of the pointer tool to achieve a variety of sizes of dots - I tried to graduate the sizes to give the impression of a fade - to limited success, I think.  As always, the rest of my toenails get an abridged version of the design...they're just too small to give a shit about!

  Not quite finished with the comic-book theme, I decided to try out a little party-nail action on my fingers.  I used Sally Hansen's Smooth & Perfect in Dune as the base coat.  I have mentioned this color before, and I think I'm gaining more of an appreciation for it - it's nearly clear, and it works like a mineral powder - just makes my nails look like a more perfect version of their natural selves!  Also, it's not a pink-tinted sheer, which makes it unique!

 I've done a slightly-offset two-color diagonal grid pattern here.  The offsetting is what gives this look it's graphic, Lichtenstein-esque quality.


  Surprisingly, the higher contrast color combinations ended up looking a lot better - my favorite combo ended up being the orange/blue (left ring finger).  I had initially thought a more subtle blend would be the answer, but you can see on the yellow/green green/orange combination, that this was kind of a fail.  Perhaps a brighter background would have given the colors some pop, but you know how I feel about white nail polish....

Tuesday, June 26, 2012

Double Nail Extravaganza!

  Oh my god!  My nail is finally healed and I've been varnishing with a vengeance, I tell you!  Remember back here when I hurt my stupid thumb?  Well I swear this nail has been growing extra-fast to cover the exposed under-thumb territory.  Anyhoo, aside from a little bit of weird, sad discoloration, it's back in business!

  Let's kick off today's double header with the mutha'fuckin NEON YELLOW manicure that I went on a drugstore odyssey in order to achieve.  Would you believe I went to three stores before I found the damn stuff?  And naturally I went for the one everyone had mentioned on teh blogz, which was, sadly, Neon Melon  by Sinful Colors, which sucks.  It's awful, streaky, gloppy stuff, and I left it on my hands for barely half a day.  The next day I went to Sally's Beauty Supply like a good girl and bought some China Glaze Celtic Sun which, true to form, goes on fabulously - smooth thin layers, just the way I like 'em.   This level of opacity took three coats.

Just ignore my janky thumb on the right, there.  It's just the aftermath of the thumb-trauma - don't judge me.

  Ahh, and viola!  What light from yonder fingertip breaks?  It is the east, and Neon Yellow is the sun.  Call me a trend whore all you want, but god damnit, I love me some neon yellow right now!  It just looks so good!  And in a June marked by grey skies and wet shoes, it's really cheering me up.

  I can't resist getting all artsy on my nails, so these lovelies are accented with a couple of blues - an unremarkable medium-blue I bought from Urban Outfitters that barely deserves a mention, and Revlon Royal, which is a glorious and delightful polish.  I also used another unimpressive UO polish, a grey that's a nice color, but a real shit polish, if you ask me.  I covered it with Sally Hansen Gem Crush in Glitz Gal, which I will talk more about in a minute.  I even added a few blue heart-shaped gems, which, while a little blurry in the photos, actually turned out pretty cute and far less tacky than my maiden voyage into nail gems.


That slight touch of rainbow!  Ah!  It's beautiful!!
  Now, I find that neons don't tend to last very long before they start to show signs of the various tiny traumas of my day, and get all opaque and cracked.  So once the neon went the way of the buffalo, I decided to run with that grey glitter on grey nails that I'd done on just a few accents above, and do something kinda classy for a change. 


  Oh my god, I have to say, this Sally Hansen Gem Crush line of glitter topcoats is fucking awesome.  I'm totally back into glitter, especially if it's a nice dense glitter with varying sizes.  It's got to have varying sizes of glitter in there, and lots of it.  The grey is awesome because it has just a touch of iridescence, which is a nice subtle color effect on the muted-for-glitter-nails grey.   Doesn't this manicure just look so effing glamorous!?  I spent the whole week just admiring my nails everywhere I went!

Friday, June 8, 2012

Yellow Triangle Moons: Variations on a Theme

  Despite every fiber of my being resisting, I'm going to blog in the name of consistency.  It's been a rough week.

  Anyway, when I'm feeling like an easy manicure, I usually do a simple duo-tone look.  I love, love, loooove half-moon manicures, so I've been having fun with variations of the moon manicure!  One of the easiest and most obvious variations is, of course, triangles!  (They're so hot right now!)


Neon Yellow Triangle "Moons"

More accurate representation of the colors.
  This particular color combo, StripeRite neon yellow over Revlon matte grey (I'm gonna have to check up on that one later, I cannot remember.  I think it was called "Cloud" or some such nonsense...)  This looks so, so much better in photos than in real life.  The yellow just doesn't pop from the grey unless it's got a direct light source.  SO, things to know if you want to try this color combo.  I'd recommend outlining the triangles in black, or doing a base coat of white before you apply the yellow.

You can see in the second photo how much the yellow sort of blends into the grey, and you completely lose the tips!  They just look like regular half-moons! They're just too close in hue, which I found surprising.  Ah, adventures in color theory!

Tuesday, May 29, 2012

Neon Orange Triangle Tips

  If it wasn't already apparent, I am obsessed with neon orange nail polish right now.  It's just so...so...  I don't know, juicy?  I love it.  It's like red's sassy cousin who likes to party.  It's also got huge hipster-ugly potential, which I love.  There's just something about an especially jarring color combo.  When colors fight each other, I feel it almost gives them an enhanced richness.  Like when you see something you've never noticed before but you're sure it's always been there.  "How did I not notice that about neon orange before?"

 Today's is a nice simple manicure, a bit of a punk-rock take on the classy French tips.  The colors are the Sally's Beauty StripeRite in neon orange (the only StripeRite I will ever truly love.  It has the perfect consistency.  As I said previously, the others leave a lot to be desired.)  The base is maybe my favorite polish of all time.  The brand is Savina, which is always, always available at Nordstrom Rack for a mere four-ish dollars.  This particular color is "White Lavender," which is neither white nor lavender, but the perfect opaque peachy-pink-nude.  I really love it as a neutral base, or for a more mod-looking French.  The peach also makes a really nice base for any design just by virtue of it's opacity and color - it doesn't show through, and while it's not as brightening as white, it won't darken your top color (which I HATE!!!)

  The neon orange against the softy-lingerie peach looks so wrong it's right.  It's got that awkward '70s color vibe that I just love!! (One day I'll show you a picture of my living room decor.  I think will explain everything!)


  If you don't have nail art brushes or a steady hand, you can totally tape off this manicure and do it that way - usually I see it done where the tip color is done first, then masked off with a corner of scotch tape, over which the main color is applied.  I do the base coat first and free-hand the triangles on top, so they're not quite uniform as you can see, but it's not hard to get these looking right free-hand.

Wednesday, May 23, 2012

ManiCure: Neon Checkers

OMG!  I'm surprised by how cool my nails are!
Party Nails, Party Nails, PARTY NAILSSSS!!!

I love doing outrageous nails.  I saw a checked swimsuit with a neon color scheme, and I knew it was meant for my nails.  (Once again using the webcam to combat my camera's phobia of neon orange.)

Here's a small close-up.  I did a 4x4 grid on each nail except a few, where I did a "zoomed in" look (like the pinkie and pointer on my left hand, which as we all know is way more difficult for me to paint.  So I cheated a little bit by simplifying my pattern.)

For these I used a white base (plain ol' OPI white) and some skinny-brush-having paints for the details, StripeRite from Sally Beauty Supply.  When I started getting into the minutiae of nail designs, I bought a whole bunch of these because they have teeny tiny brushes, and Sally's is like, a block from my work.  So, perfect.

...Except not.  These nail polishes are crap, yo.  The only ones that seem to work are the neons, since they seem to stay in liquid form and are very smooth, if a bit more viscous than I'm used to.  No amount of nail polish fixer can fix these, either, if that's what you're thinking.  I really recommend getting some nail art brushes - I bought a 15-pack on Amazon for like, three bucks, but a single brush at Sally's is nearer to fifteen bucks.

Next time, maybe a post that isn't about nail polish...

Tuesday, May 22, 2012

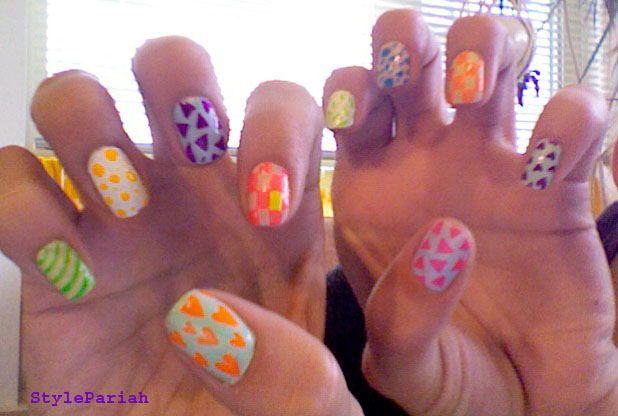
Party Nails: Clarissa Explains it All...

  Usually I have a basic idea, or at least a color scheme, when I set out to paint a new manicure.  Other times, I have so many ideas floating around that I can't pick favorites, so I'll do what I call Party Nails!  They are great for experimenting with color combinations, designs, or techniques (or a mix of all three!) 

For this look, I decided to pit pastels against neons, and combine my two favorite awkward color trends of the season!  (Seriously, why are both so wrong and yet....feel so right?)  I also wanted to try a funky '80s triangle pattern, but wasn't sure I'd be able to execute it properly on all fingers, so I went with a multitude of patterns!  Once finished, I realized I'd totally been channeling Clarissa Darling!  I'd like to pop my ladder up to her window so I could see what she thought...

Clarissa Manicures It All


And here are the results!  I have a lot of great ideas kicking around in my head after doing this manicure!

Despite doing a pretty good job (if I do say so myself) on the left hand (leftie pride - holla at me!), I still don't know if I'm ready for full triangles.  I use nail art brushes (super cheap on Amazon) to hand-paint all my designs, and precision definitely requires practice.

Anyway, I'm totally obsessed with both the triangles and the little hearts, especially the neon orange on mint green!  The colors are fairly true to life here, but the orange is so much more neon than these photos would have you believe.  For some reason, my little digital camera just doesn't want to pick up that orange!

I also took a long time debating between white and lavender as the final base color.  I ended up going with white, but in retrospect I really wish I'd gone with the lavender.  I think it would have jibed with the other colors better.  Oh well, something to think about for next time!


(Yes, that is a little pill-o-the-week case in the background left on the bottom photo.  I got this cute flower-patterned one at Daiso Japan, and I use it to organize my fake eyelashes! It's just the thing!) 

I am obsessed with the thumbs of this manicure!!