Luckily for me, the Lovely Les came by with a special pho delivery, and I could not be more ecstatic or grateful! I will live to blog another day.
AAAAANYWAY, let's get down to crafting.
I had to crack open my beading box to fix an old necklace, and much like Pandora's, shit just keeps coming out of this box, begging me to do something with it already!
I decided to make a copy of this awesome brown leather braided wrap bracelet that my Dear Roommate owns. She wears it all the time and I've secretly been plotting how to make my own. Happily for us all, it's super, super simple! In fact, my source for leather was a package of rawhide shoelaces that I bought at the drug store for about five dollars! (I used Kiwi brand, but I'm certain any old rawhide shoelace would do. The Kiwi ones are nice and long - I made my bracelet AND ring out of just one! I have a whole 'nother shoelace's worth of crafting ahead of me!!
 |
| The finished products! |
Pretty simple start up, I measured and cut my leather strip into three equal lengths, and glued the three ends together, side to side, and about 1cm down the length of the strip. (I love Beadalon brand "Bead Fix," which you can almost always find at a craft or bead store. Unlike most super glues, this one dries completely clear, making it a god among super glues.)
Next I used some flexible gold jewelry wire to reinforce the glued-together end and attach a lobster clasp. Then you simply braid the leather until it's at desired length. I braided long enough for a double-wrap bracelet, with enough leather left over (from just one shoelace, mind!) to make a ring, too! In fact, the wrap-bracelet is long enough to double as a leather choker! Bonus!! I did the same gluing and wrapping on the terminal end of the bracelet, to attach a clasp hoop. I used needle-nose pliers to make sure the wire wrapping was good 'n tight, as well as the end secured so it doesn't get pokey.
 |
| Topside, and backside with lobster clasp. Wondering if perhaps a closure like the ring would be better? |
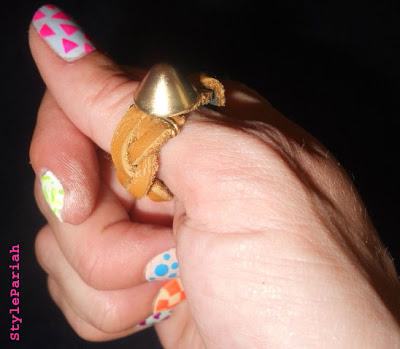
The ring got a little more complicated, as I wanted a complete band of leather without any gaps for a clasp. In this case, instead of gluing the three ends together, I pierced each one width-wise approximately 1/3 cm from the edge of the strip, and ran a head pin all the way through each strand, which I then wrapped around the leather ends until there was no pin left, effectively creating a double-strand of wire on the topside of each end of the ring, which I attached using one of the fab gold studs I just got in the mail! This one was a really last minute improvisation, but the two-pronged cone was the perfect size and shape to connect the sides of this ring! It's a bit chunky, probably relegated to a thumb ring for the time being, but I'm thinking with some wear, this will flatten out into a nice, soft, any-finger ring!
 |
| Top and underside of the braided leather ring, which features a brass cone stud from my recent haul! |
 |
| A more flattering view, of the ring on an actual finger! |

putting in my request for a leather bracelet! my wrist is size tiny! :) wish i could have come by with pho today...hope you are feeling better!
ReplyDeleteOkay! I can do that, but you'll have to come to Seattle to pick it up!!
Deleteone more thing - your heart nails are too cute.
ReplyDelete